Hello, Sign in
My Account
My Account
New customer? Start here

| Catalog # | Availability | Size | Quantity | Unit Price | Save For Later Wish List | |
|---|---|---|---|---|---|---|
| EKFT1977MU-96 | 7-10 Days | 96T | $640.00 |
Select product before adding to cart
|
||
| EKFT1977MU-48 | 7-10 Days | 48T | $448.00 |
Product Overview | ||||||||||||||||||||||||||||||||||||||||||||||||||||||||||||||||||||
| Name | Mouse 1-acylglycerol-3-phosphate O-acyltransferase Pnpla3 (Pnpla3) ELISA Kit | |||||||||||||||||||||||||||||||||||||||||||||||||||||||||||||||||||
|---|---|---|---|---|---|---|---|---|---|---|---|---|---|---|---|---|---|---|---|---|---|---|---|---|---|---|---|---|---|---|---|---|---|---|---|---|---|---|---|---|---|---|---|---|---|---|---|---|---|---|---|---|---|---|---|---|---|---|---|---|---|---|---|---|---|---|---|---|
| Accession (Primary) | Q91WW7 | |||||||||||||||||||||||||||||||||||||||||||||||||||||||||||||||||||
| Sensitivity | 0.094ng/ml | |||||||||||||||||||||||||||||||||||||||||||||||||||||||||||||||||||
| Assay Range | 0.156-10ng/ml | |||||||||||||||||||||||||||||||||||||||||||||||||||||||||||||||||||
| Sample type(s) | Serum, Plasma, Cell Culture Supernatant, cell or tissue lysate, Other liquid samples | |||||||||||||||||||||||||||||||||||||||||||||||||||||||||||||||||||
| Other Names | ||||||||||||||||||||||||||||||||||||||||||||||||||||||||||||||||||||
| 1-acylglycerol-3-phosphate O-acyltransferase Pnpla3, 2.3.1.51, Acylglycerol transacylase, 3.1.1.3, Pnpla3 {ECO:0000312|MGI:MGI:2151796}, Adpn | ||||||||||||||||||||||||||||||||||||||||||||||||||||||||||||||||||||
| Product Features | ||||||||||||||||||||||||||||||||||||||||||||||||||||||||||||||||||||
| ||||||||||||||||||||||||||||||||||||||||||||||||||||||||||||||||||||
| Principle of the Assay | ||||||||||||||||||||||||||||||||||||||||||||||||||||||||||||||||||||
| This kit was based on sandwich enzyme-linked immune-sorbent assay technology. Anti Pnpla3 antibody was pre-coated onto the 96-well plate. The biotin conjugated anti Pnpla3 antibody was used as the detection antibody. The standards and pilot samples were added to the wells subsequently. After incubation, unbound conjugates were removed by wash buffer. Then, biotinylated detection antibody was added to bind with Pnpla3 conjugated on coated antibody. After washing off unbound conjugates, HRP-Streptavidin was added. After a third washing, TMB substrates were added to visualize HRP enzymatic reaction. TMB was catalyzed by HRP to produce a blue color product that turned yellow after adding a stop solution. Read the O.D. absorbance at 450nm in a microplate reader. The concentration of Pnpla3 in the sample was calculated by drawing a standard curve. The concentration of the target substance is proportional to the OD450 value. | ||||||||||||||||||||||||||||||||||||||||||||||||||||||||||||||||||||
| Kit Components and Storage | ||||||||||||||||||||||||||||||||||||||||||||||||||||||||||||||||||||
The sealed kit can be stored at 2-8 ℃. The storage condition for opened kit is specified in the table below:
Note: The liquid reagent bottle contains slightly more reagent than indicated on the label. Please use pipette accurately measure and do proportional dilution. | ||||||||||||||||||||||||||||||||||||||||||||||||||||||||||||||||||||
| Required Instruments and Reagents | ||||||||||||||||||||||||||||||||||||||||||||||||||||||||||||||||||||
| 1. Microplate reader (wavelength: 450nm) 2. 37°C incubator (CO2 incubator for cell culture is not recommended.) 3. Automated plate washer or multi-channel pipette/5ml pipettor (for manual washing purpose) 4. Precision single (0.5-10μL, 5-50μL, 20-200μL, 200-1000μL) and multi-channel pipette with disposable tips(calibration is required before use.) 5. Sterile tubes and Eppendorf tubes with disposable tips 6. Absorbent paper and loading slot 7. Deionized or distilled water | ||||||||||||||||||||||||||||||||||||||||||||||||||||||||||||||||||||
| Sample Collection and Storage | ||||||||||||||||||||||||||||||||||||||||||||||||||||||||||||||||||||
| 1. Serum Place whole blood sample at room temperature for 2 hours or at 2-8°C overnight. Centrifuge for 20min at 1000xg and collect the supernatant to detect immediately. Or you can aliquot the supernatant and store it at -20°C or -80°C for future’s assay. 2. Plasma EDTA-Na2/K2 is recommended as the anticoagulant. Centrifuge samples for 15 minutes at 1000×g 2-8°C within 30 minutes after collection. Collect the supernatant to detect immediately. Or you can aliquot the supernatant and store it at -20°C or -80°C for future’s assay. For other anticoagulant types and uses, please refer to the sample preparation guideline. 3. Tissue Sample Generally tissue samples are required to be made into homogenization. Protocol is as below: 3.1. Place the target tissue on the ice. Remove residual blood by washing tissue with pre-cooling PBS buffer (0.01M, pH=7.4). Then weigh for usage. 3.2. Use lysate to grind tissue homogenates on the ice. The adding volume of lysate depends on the weight of the tissue. Usually, 9mL PBS would be appropriate to 1 gram tissue pieces. Some protease inhibitors are recommended to add into the PBS (e.g. 1mM PMSF). 3.3. Do further process using ultrasonic disruption or freeze-thaw cycles (Ice bath for cooling is required during ultrasonic disruption; Freeze-thaw cycles can be repeated twice.) to get the homogenates. 3.4. Homogenates are then centrifuged for 5 minutes at 5000×g. Collect the supernatant to detect immediately. Or you can aliquot the supernatant and store it at -20°C or -80°C for future’s assay. 3.5. Determine total protein concentration by BCA kit for further data analysis. Usually, total protein concentration for Elisa assay should be within 1-3mg/ml. Some tissue samples such as liver, kidney, pancreas which containing a higher endogenous peroxidase concentration may react with TMB substrate causing false positivity. In that case, try to use 1% H2O2 for 15min inactivation and perform the assay again. Notes: PBS buffer or the mild RIPA lysis can be used as lysates. While using RIPA lysis, make the PH=7.3. Avoid using any reagents containing NP-40 lysis buffer, Triton X-100 surfactant, or DTT due to their severe inhibition for kits’ working. We recommend using 50mM Tris+0.9%NaCL+0.1%SDS, PH7.3. You can prepare by yourself or contact us for purchasing. 4. Cell Culture Supernatant Collect the supernatant: Centrifuge at 2500 rpm at 2-8℃ for 5 minutes, then collect clarified cell culture supernatant to detect immediately. Or you can aliquot the supernatant and store it at -80°C for future’s assay. Cell Lysate Suspension Cell Lysate: Centrifuge at 2500 rpm at 2-8℃ for 5 minutes and collect cells. Then add pre-cooling PBS into collected cell and mix gently. Recollect cell by repeating centrifugation. Add 0.5-1ml cell lysate and appropriate protease inhibitor (e.g. PMSF, working concentration: 1mmol/L). Lyse the cell on ice for 30min-1h or disrupt the cell by ultrasonic disruption. 5.2. Adherent Cell Lysate: Absorb supernatant and add pre-cooling PBS to wash three times. Add 0.5-1ml cell lysate and appropriate protease inhibitor (e.g. PMSF, working concentration: 1mmol/L). Scrape the adherent cell with cell scraper. Lyse the cell suspension added in the centrifuge tube on ice for 30min-1h or disrupt the cell by ultrasonic disruption. 5.3. During lysate process, use the tip for pipetting or intermittently shake the centrifugal tube to completely lyse the protein. Mucilaginous product is DNA which can be disrupted by ultrasonic cell disruptor on ice. (3~5mm probe, 150-300W, 3~5 s/time, 30s intervals for 1~2s working). 5.4. At the end of lysate or ultrasonic disruption, centrifuge at 10000rpm at 2-8℃ for 10 minutes. Then, the supernatant is added into EP tube to detect immediately. Or you can aliquot the supernatant and store it at -80°C for future’s assay. Notes: Read notes in tissue sample. 6. Other Biological Sample Centrifuge samples for 15 minutes at 1000×g at 2-8℃. Collect the supernatant to detect immediately. Or you can aliquot the supernatant and store it at -80°C for future’s assay. Recommended reagents for sample preparation: 100mM PMSF protease inhibitor, Lysis Buffer (for ELISA). | ||||||||||||||||||||||||||||||||||||||||||||||||||||||||||||||||||||
| Notes for Samples | ||||||||||||||||||||||||||||||||||||||||||||||||||||||||||||||||||||
| Blood collection tubes should be disposable and non-endotoxin. Avoid to use hemolyzed and lipemia samples. The best sample storage condition: less than 5 days at 2-8℃; within 6 months at -20℃; within 2 years at -80℃. Stored in liquid nitrogen for a longer storage. When melting frozen samples, rapid water bath at 15-25℃ can decrease the effect of ice crystal (0℃) on the sample. After melting, centrifuge to remove the precipitate, and then mix well. The detection range of this kit is not equivalent to the concentration of analyze in the sample. For analyses with higher or lower concentration, please properly dilute or concentrate the sample. 4. Pretest is recommended for special samples without reference data to validate the validity. 5. Recombinant protein may not match with the capture or detection antibody in the kit, resulting in the undetectable assay. | ||||||||||||||||||||||||||||||||||||||||||||||||||||||||||||||||||||
| Precautions for Kits | ||||||||||||||||||||||||||||||||||||||||||||||||||||||||||||||||||||
| 1. When using different Elisa kits, labeling is required to avoid mixed components and failed assay. 2. After opening the kit, please refer to the table of storage condition for coated plate and standards (Dampness may decrease the activity.). If any component is missing or damaged during the assay or storage, please contact us for ordering a new one to replace.(e.g. lyophilized standard) 3. Sterile and disposable tips are required during the assay. After use, the reagents bottle cap has to be tightened to avoid the microbial contamination and evaporation. 4. While manual washing, please keep tips or pipettors for adding wash buffer away from the well. Insufficient washing or contamination easily causes false positive and high background. 5. During the assay, prepare required reagents for next step in advance. After washing, add the reagent into the well in time to avoid dryness. Otherwise, dry plate will result in the failed assay. 6. Before confirmation, reagents from other batches or sources should not be used in this kit. 7. Don't reuse tips and tubes to avoid cross contamination. 8. After loading, seal the plate to avoid the evaporation of the sample during incubation. Complete the incubation process at recommended temperature. 9. Please wear the lab coat, mask and gloves to protect yourself during the assay. Especially, for the detection of blood or other body fluid samples, please follow regulations on safety protection of biological laboratory. | ||||||||||||||||||||||||||||||||||||||||||||||||||||||||||||||||||||
| Recommended Sample Dilution Ratio | ||||||||||||||||||||||||||||||||||||||||||||||||||||||||||||||||||||
| Please refer to shipped instructions or contact us for samples, dilution as well background info. The matrix components in serum/plasma will affect the test results, which it need to be diluted at least 1/2 with Sample Dilution Buffer before testing! If other dilution ratio for your sample model is required, please refer to the universal dilution ratio below. (The ratio is suitable for single-well assay. For duplicate assay, please follow the calculation: volume of sample and diluent x number of duplicate well) For 2 fold dilution (1/2): One step dilution. Add 60ul sample into 60ul sample diluent and mix gently. For 5 fold dilution (1/5): One step dilution. Add 24ul sample into 96ul sample diluent and mix gently. For 10 fold dilution (1/10): One step dilution. Add 12ul sample into 108ul sample diluent and mix gently. For 20 fold dilution (1/20): One step dilution. Add 6ul sample into 114ul sample diluent and mix gently. For 50 fold dilution (1/50): One step dilution. Add 3ul sample and 47ul normal saline (0.9% NaCl) into 100ul sample diluent and mix gently. For 100 fold dilution (1/100): One step dilution. Add 3ul sample and 177ul normal saline into 120ul sample diluent and mix gently. For 1000 fold dilution (1/1000): Two step dilution. Create a 50-fold dilution first (normal saline is used throughout the dilution). Then, create a 20-fold dilution and mix gently. For 10000 fold dilution (1/10000): Two step dilution. Create a 100-fold dilution first (normal saline is used throughout the dilution). Then, create the same dilution again and mix gently. For 100000 fold dilution (1/100000): Three step dilution. Create a 50-fold dilution and 20-fold dilution respectively (normal saline is used in the first two steps.) Finally, create a 100-fold dilution and mix gently. Notes: The volume in each dilution is not less than 3ul. Dilution factor should be within 100 fold. Mixing during dilution is required to avoid foaming. | ||||||||||||||||||||||||||||||||||||||||||||||||||||||||||||||||||||
| Reagent Preparation and Storage | ||||||||||||||||||||||||||||||||||||||||||||||||||||||||||||||||||||
| Take the Elisa kit from the fridge around 20 minutes earlier and equilibrate to room temperature(18-25℃). For repeated assays, please just take the strips and standards required for the current assay, store the rest materials according to the relevant condition. Wash Buffer Dilute 30ml (15ml for 48T) concentrated wash buffer to 750ml (375ml for 48T) wash buffer with deionized or distilled water and mix well. (The recommended resistivity of ultrapure water is 18MΩ.) Alternatively, take appropriate amount of concentrated wash buffer according to the assay requirement, then create a 25-fold dilution and mix well. Store the rest solution at 2-8℃. Crystals formed in the concentrated wash buffer can be heated by water bath at 40℃ till complete dissolution. (Heating temperature should be below 50℃.) Mix well for the next step. It's better to use up the prepared wash buffer in one day. Store the rest buffer at 2-8℃ within 48h. 2. Standards 2.1. Centrifuge standards tube for 1min at 10000xg. Label it as Zero tube. 2.2. Add 1ml sample dilution buffer into the standard tube. Tighten the tube cap and Let it stand for 2min at room temperature. Invert the tube several times to mix gently. (Or you can mix it using a low speed vortex mixer for 3-5 seconds.) 2.3. Centrifuge the tubes for 1min at 1000xg, making the liquid towards the bottom of tube and removing possible bubbles. 2.4. Standard dilution: Label 7 EP tubes with 1/2, 1/4, 1/8, 1/16, 1/32, 1/64 and blank respectively. Add 0.3ml of the sample dilution buffer into each tube. Add 0.3ml solution from zero tube into 1/2 tube and mix them thoroughly. Transfer 0.3ml from 1/2 tube into 1/4 tube and mix them thoroughly. Transfer 0.3ml from 1/4 tube into 1/8 tube and mix them thoroughly, so on till 1/64 tube. Now blank tube only contain 0.3ml sample dilution buffer. The standard concentration from zero tube to blank tube is 10ng/ml, 5ng/ml, 2.5ng/ml, 1.25ng/ml, 0.625ng/ml, 0.312ng/ml, 0.156ng/ml, 0ng/ml. 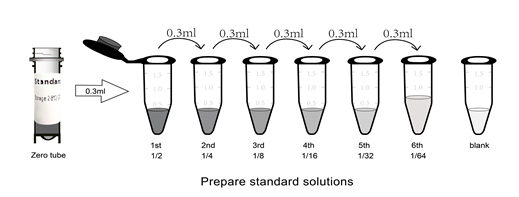 Notes: Store the zero tube with dissolved standards at 2-8℃ and use it within 12h. Other diluted working solutions containing standards should be used in 2h. 3. Preparation of Biotin-labeled Antibody Working Solution The working solution should be prepared within 30min before the assay and can't be stored for a long time. 3.1. Calculate required total volume of the working solution: 100ul/well x quantity of wells. (It's better to prepare additional 100ul-200ul.) 3.2. Centrifuge for 1min at 1000xg in low speed and bring down the concentrated biotin-labeled antibody to the bottom of tube. 3.3. Dilute the biotinylated detection antibody with antibody dilution buffer at 1:99 and mix them thoroughly. (e.g. Add 10ul concentrated biotin-labeled antibody into 990ul antibody dilution buffer.) 4. Preparation of HRP-Streptavidin Conjugate (SABC) Working Solution The working solution should be prepared within 30min before the assay and can't be stored for a long time. 4.1. Calculate required total volume of the working solution: 100ul/well x quantity of wells. (It's better to prepare additional 100ul-200ul.) 4.2. Centrifuge for 1min at 1000xg in low speed and bring down the concentrated SABC to the bottom of tube. 4.3. Dilute the concentrated SABC with SABC dilution buffer at 1:99 and mix them thoroughly. (e.g. Add 10ul concentrated SABC into 990ul SABC dilution buffer.) | ||||||||||||||||||||||||||||||||||||||||||||||||||||||||||||||||||||
| Assay Procedure Summary | ||||||||||||||||||||||||||||||||||||||||||||||||||||||||||||||||||||
| Step 1: Add 100ul standard or sample into each well, seal the plate and static incubate for 90 minutes at 37°C. Washing: Wash the plate twice without immersion. Step 2: Add 100ul biotin-labeled antibody working solution into each well, seal the plate and static incubate for 60 minutes at 37°C. Washing: Wash the plate three times and immerse for 1min each time. Step 3: Add 100ul SABC working solution into each well, seal the plate and static incubate for 30 minutes at 37°C. Washing: Wash the plate five times and immerse for 1min each time. Step 4: Add 90ul TMB substrate solution, seal the plate and static incubate for 10-20 minutes at 37°C. (Accurate TMB visualization control is required.) Step 5: Add 50ul stop solution. Read at 450nm immediately and calculate. | ||||||||||||||||||||||||||||||||||||||||||||||||||||||||||||||||||||
| Detailed Assay Procedure | ||||||||||||||||||||||||||||||||||||||||||||||||||||||||||||||||||||
| When diluting samples and reagents, they must be mixed completely. It's recommended to plot a standard curve for each test. 1. Set standard, pilot samples, control (blank) wells on the pre-coated plate respectively, and then, records their positions. It's recommended to measure each standard and sample in duplicate to decrease experimental errors. 2. Standards and samples loading: Aliquot 100ul of zero tube, 1st tube, 2nd tube, 3rd tube, 4th tube into each standard well. Also add 100ul sample dilution buffer into the control (blank) well. Then, add 100ul pilot samples into each sample well. Seal the plate and static incubate for 90 minutes at 37°C. (Add the solution to the bottom of each well. Mix gently and without touch the sidewall and foam the sample.) 3. Wash twice: Remove the cover, then absorb the liquid in the plate or tap the plate on a clean absorbent paper two or three times. Add 350ul wash buffer into each well without immersion. Discard the liquid in the well and tap on the absorbent paper again. Repeat the washing step twice. 4. Biotin-labeled Antibody: Add 100ul biotin-labeled antibody working solution into each well. Seal the plate and static incubate for 60 minutes at 37°C. 5. Wash three times: Remove the cover, then absorb the liquid in the plate or tap the plate on a clean absorbent paper two or three times. Add 350ul wash buffer into each well and immerse for 1min. Discard the liquid in the well and tap on the absorbent paper again. Repeat the washing step three times. 6. HRP-Streptavidin Conjugate (SABC): Add 100ul SABC working solution into each well. Seal the plate and static incubate for 30 minutes at 37°C. (Put the whole bottle of TMB into the 37°C incubator to equilibrate for 30min.) 7. Wash five times: Remove the cover, and then wash the plate with wash buffer five times. Read washing method in step 5. 8. TMB Substrate: Add 90ul TMB Substrate into each well, seal the plate and static incubate at 37°C in dark within 10-20 minutes. Run the microplate reader and preheat for 15min. (Notes: Please do not use the reagent reservoirs used by HRP couplings. The reaction time can be shortened or extended according to the actual color change, but not more than 30 minutes. You can terminate the reaction when apparent gradient appeared in standard wells. Weaker or stronger color intensity is unacceptable.) 9. Stop: Keep the liquid in the well after staining. Add 50ul stop solution into each well. The color will turn yellow immediately. The order for adding stop solution and TMB substrate solution is the same. 10. OD Measurement: Read the O.D. absorbance at 450nm in a microplate reader immediately. (If your microplate reader has a choice of correction wavelength, set it to 570nm or 630nm. Correct the read value to the OD450 value minus the OD570 or OD630 value. In this way, the OD value of non-chromogenic substances can be corrected and removed, thus obtaining more accurate results. If the microplate reader does not have a 570nm or 630nm wavelength, the original OD450 value can be used.) | ||||||||||||||||||||||||||||||||||||||||||||||||||||||||||||||||||||
| Calculation of Results | ||||||||||||||||||||||||||||||||||||||||||||||||||||||||||||||||||||
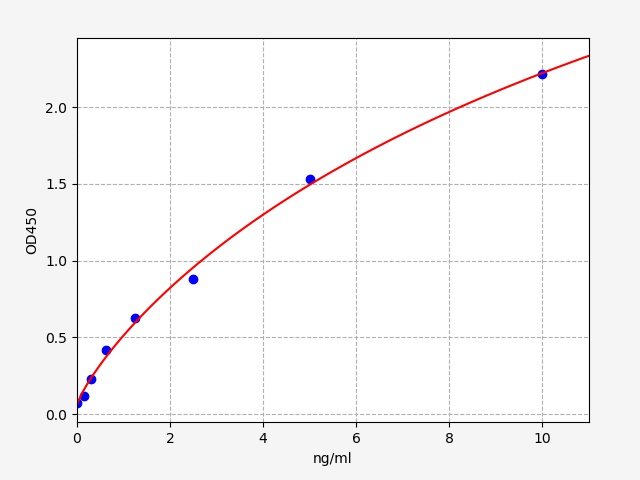
| 1. Calculate the mean OD450 value (using the original OD450 value or the corrected OD450 value) of the duplicate readings for each standard, control, and sample. Then, obtain the value of calculation by subtracting the OD450 blank. 2. Create a four parameter logistic curve by plotting the mean absorbance for each standard on the y-axis against the concentration on the x-axis. (Remove the OD450 blank during plotting.) Alternatively, you can use the curve fitting software offered by the microplate reader (e.g. Thermo SkanIt RE software, Curve Expert 1.3 or 1.4). 3. Calculate the sample concentration by substituting OD450 value into the standard curve. Diluted samples should be multiplied by the relevant dilution ratio. | ||||||||||||||||||||||||||||||||||||||||||||||||||||||||||||||||||||
| Typical Data & Standard Curve | ||||||||||||||||||||||||||||||||||||||||||||||||||||||||||||||||||||
| This product has been tested by Quality Control Department and meets performance specifications mentioned in the manual. (The humidity in the laboratory is 20%-60%, and the temperature is 18°C -25°C. TMB was balanced to 37°C before color development, and incubated at 37°C for 15 minutes in the dark after adding the enzyme label plate holes.) The following assay data are provided for reference, since experimental environment and operation are different. The establishment of standard curve depends on your own assay.
 | ||||||||||||||||||||||||||||||||||||||||||||||||||||||||||||||||||||
| Precision | ||||||||||||||||||||||||||||||||||||||||||||||||||||||||||||||||||||
| Intra-assay Precision: samples with low, medium and high concentration are tested 20 times on same plate. Inter-assay Precision: samples with low, medium and high concentration are tested 20 times on three different plates.
| ||||||||||||||||||||||||||||||||||||||||||||||||||||||||||||||||||||
| Recovery | ||||||||||||||||||||||||||||||||||||||||||||||||||||||||||||||||||||
Add a certain amount of Pnpla3 into the sample. Calculate the recovery by comparing the measured value with the expected amount of Pnpla3 in the sample.
| ||||||||||||||||||||||||||||||||||||||||||||||||||||||||||||||||||||
| Linearity | ||||||||||||||||||||||||||||||||||||||||||||||||||||||||||||||||||||
Dilute the sample with a certain amount of Pnpla3 at 1:2, 1:4 and 1:8 to get the recovery range.
| ||||||||||||||||||||||||||||||||||||||||||||||||||||||||||||||||||||
| Stability | ||||||||||||||||||||||||||||||||||||||||||||||||||||||||||||||||||||
Perform the stability test for the sealed kit at 37°C and 2-8°C and get relevant data.
| ||||||||||||||||||||||||||||||||||||||||||||||||||||||||||||||||||||
| ELISA Troubleshooting | ||||||||||||||||||||||||||||||||||||||||||||||||||||||||||||||||||||
If the ELISA result is unsatisfied, please take a screenshot for the staining result and store the OD data. Keep used strips as well the rest reagents. Contact us to solve your problem with the kit’s catalogue number and batch number. You can also refer to the following table to check the reason.
| ||||||||||||||||||||||||||||||||||||||||||||||||||||||||||||||||||||
| Declaration | ||||||||||||||||||||||||||||||||||||||||||||||||||||||||||||||||||||
| Limited to current conditions and scientific techniques, all raw materials are not completely identified and analyzed. This product may have a technology-related quality risk. During the Elisa kit development, some endogenous interferons(not all) in the biological sample have been removed or decreased. The final assay result is related to the validity of reagents, experimental operation and environment. Our company is only responsible for this kit, excluding sample consumption during using this kit. Before use, please consider and prepare enough samples required by the assay. To get a satisfied assay result, please use all reagents offered by this kit. Don't use any product from other vendors. Strictly follow instructions of this manual. During assay procedure, incorrect reagents preparation and parameter setting of the microplate reader may result in the abnormal result. Before assay, please read this manual carefully and adjust instruments. Even if the assay is performed by the same person, results in two independent assays may be different. Thus, each step in the assay should be controlled to ensure the reproducibility. Before delivery, this kit is subject to the strict QC. Influenced by transportation conditions and experimental devices, the assay result got by the customer may be different from original data. Inter-assay CV between different batches may be caused by reasons before. This kit is not compared to similar kits from other vendors or methods for testing the same detection target. Thus, assay results may be inconsistent. This kit allows for research use only. For IVD or other purposes, our company is not responsible for relevant consequences and doesn't bear any legal liability. | ||||||||||||||||||||||||||||||||||||||||||||||||||||||||||||||||||||
Target Information: ( Q91WW7 ) | ||||||||||||||||||||||||||||||||||||||||||||||||||||||||||||||||||||
| Name | Pnpla3 {ECO:0000312|MGI:MGI:2151796} | |||||||||||||||||||||||||||||||||||||||||||||||||||||||||||||||||||
| Gene ID | 116939 | |||||||||||||||||||||||||||||||||||||||||||||||||||||||||||||||||||

Thousands of laboratories across the world have published research that depended on the performance of antibodies from ADMEbio to advance their research.
Check out links to articles that cite our products in major peer-reviewed journals, organized by research category.
Thank you,
ADMEbio Team


ADMEbio welcomes feedback from our customers.
Thank you,
ADMEbio Team